|
|
 |
To
understand the process, a few words about how the yeast works
There are
four basic stages yeast cells go through. As we normally receive the yeast
culture from a reliable source, the yeast cells are usually dormant. After
the yeast are pitched into the cool and sterile wort, they get into the
waking-up stage, when they check out the environment.
If the environment is found desirable for the yeast, the next stage takes place, which is called aerobic respiration. In this stage, the yeast require |
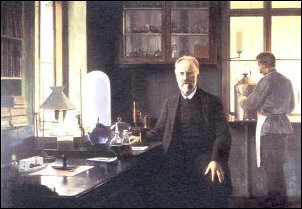
| The last massive scientific advance
in beer- making techniques, and probably the biggest ever, was Emil Hansen's
work on the isolation and cultivation of single-cell, pure culture yeasts
at the Carlsberg brewery in Denmark in the late 1800s. Hansen family "tamed"
yeast, and took the uncertainties out of brewing. This painting of Hansen
in his laboratory was made around the turn of the century. The old lab
is preserved for the sake of history.
(Michael Jackson's Beer Companion) |
oxigen, nitrogen, sugars, proteins, lipids and ions. If the wort lacks any of these, the fermentation will start slowly. However, if these elements and ingredients are present, using oxigen, the yeast will absorb huge amounts of energy and will start growing rapidly. During this rapid growth, a relatively lot of carbon dioxide will be generated, however, no alcohol (ethanol) will be produced. |
| When all the oxigen is consumed, starts the final
stage, the anaerobic fermentation. This is when the sugar-to-alcohol conversion
takes place. There is still growth of yeast taking place, increasing the
number of yeast cells.
It is fairly obvious that from the point of view of propagation, the aerobic respiration stage is the most important. This is when the fastest and most vigorous growth takes place, this is when the yeast accumulate the energy needed for the final fermentation phase. It is important to note again that this lasts only until oxygen is available plus, of course, sugar, etc., which come from the wort. The source of oxigen is either indirect through the wort or injected directly into the propagation vessel. It could be pure sterile oxigen or sterile air. Sterile air would directly contain an abundance of nitrogen. After setting the stage for the propagation this way, it is easy to figure out the right way to proceed with it. We dont have to say that the most basic rule is a meticulous cleanliness in the temperature conditioned room, test tubes, flasks, vessels, tools, valves, pipes and hoses. As we know, the propagation medium is regular brewery wort that was sterilized through boiling. This sterilization can be done while brewing a normal batch of beer and we save some of it in sterile conditions for yeast propagation. It also can be sterilized in the propagation vessel itself or using a sterilizing heat exchanger. The Propagation ProcessOnce the proper yeast has been proven for brewing, we must work out and follow the maintenance procedure. This means that, unless we do not want to re-use the yeast over and over again, we have to save some of the yeast for the next propagation and so on This also means that the sterile conditions must be maintained continuously. (If it is necessary to learn sterile yeast handling, we are not going to deal with it here. Instead we recommend a book that teaches nothing but that: Pierre Rajotte First Steps in Yeast Culturing Published by Alliage Editeur, 5639 Hutchinson St., Montreal, QC, H2V 4B5, (514) 277-5456 ISBN 2-921327-17-1.) |
 |
Step 1 Inoculate
several (6-8) test tubes with the master culture you just received from
your yeast bank, in the volume of 50 ml or 2 ounces. Aerate.
Step 2 After incubating at 76-77(F) for 2 days, examine each test tube, possibly using a microscope. Select the 2 test tubes that show the most vigorous growth with the healthiest looking yeast cells. Step 3 Add these to 500 ml sterile wort in two 1 liter (2 pints) sterile flasks. Aerate. Reduce temperature by 8 degrees (F) if lager yeast or 4 degrees (F) if ale yeast. |
| Step 4 As in
Step 2, evaluate the two flasks, and pick the better one for further propagation.
The other one, if both are equally good, can be stored at 40(F) for up
to 3 weeks, during which time period it can be used for inoculation.
Step 5 Add the selected culture to a gallon of sterile wort (4 liters). Aerate. Reduce temperature by 8 degrees (F) if lager yeast or 4 degrees (F) if ale yeast. Step 6 Add the yeast culture to 10 gallons of sterile wort (40 liters) into a stainless steel propagator vessel. Set the temperature to 54(F) in case of a lager yeast or to 68(F) in case of an ale yeast. This is going to be the last step to prepare the yeast for final pitching into the real brew. This amount will be sufficient to start an approximately 10 hl or 10 bbl fermenter with well aerated wort. The stainless steel propagator will protect the sterility of the environment for the yeast from inoculation through pitching. Keep in mind that even if you bring the temperature
of the yeast very close to the wort temperature to be used, and even if
the yeast is very active, it is going to go through a pitching shock, only
it will last much shorter time.
Please e-mail your comments, suggestions and additions related to the yeast propagation subject. We would like to publish in this web-site your opinion, experience and story related to the yeast subject. |
|
|
 |
| Bavarian Brewery Technologies - Tel.: (310) 391-1091 - Fax: (310) 391-4530 email:info@bavarianbrewerytech.com |
